Related Links
- MR2 Spyder Power Steering Removal (Part 1: Try Before You Buy)
- MR2 Spyder Power Steering Removal (Part 2: The Vented Surge Box)
- MR2 Spyder Power Steering Removal (Part 3: Disabling the P/S Warning Light)
- MR2 Spyder Power Steering Removal (Part 4: Summary and Final Install)
- MR2 Spyder Power Steering Removal (Appendix: Alternate Install)
This is the fourth addition to the MR2 Spyder power steering removal series. A lot of consideration has gone into this install specifically related to how the fluid moves inside the rack. As stated in previous articles, the point of the vented system is to keep the rack lubricated while allowing air and pressure to escape from the system. By mapping out the system, I have found several lines redundant to this requirement. So part 4 covers this approach as well as the replacement of all of the rubber lines with hard lines (brake lines) for durability. In effect, the final version creates a very sturdy, “permanent” set up and maintains the steering system in its simplest form.
Tools/Parts
- tube cutter
- tube bender
- tube end flaring tool
- thread sealant tape
- 1/4″ brake line t’s
- several 1/4″ brake lines
- 2 x 3/8″ threaded plug
- proper adapters for your surge box
Install
STEP 1: Park the car on level ground and then open the hood. Remove any plastic trim and then remove the spare and the tub. (In my case, I have to disconnect the battery and remove the strut bar.) While facing the car, disconnect the lower left steering line from the rack and drain the power steering fluid into a container.

Open the hood and then remove the spare tire and tub and any other items that will hinder access to the power steering rack.

Disconnect the lower left power steering line from the rack and then drain the fluid into an oil pan.
STEP 2: Remove the old lines and adapters leaving the reservoir in place.

This is the old adapter and lines from the steering rack that were fabricated in part 2.

Remove the 2 larger lines from the back of the rack.
STEP 3: After removing the two 3/8″ lines from the back, plug the opening with the 2 – 3/8″ plugs. Then fab 2 sets of new brake lines using the factory ends (*) on new 1/4″ brake lines. See the images below. You will need the flaring tool for this procedure. (Note: * Factory ends are the hard line fittings that connect to the steering rack. In my case, these were cut off of the factory MR2 lines and installed on new 1/4″ brake line using a flaring tool.)

Plug these two opening with the 3/8″ brass plugs.

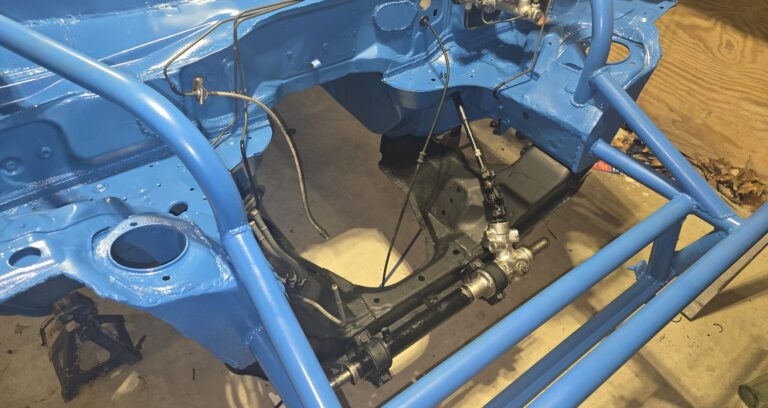
This image shows the lower ports T’ed together on the front of the steering rack. The factory fittings to the rack were used with new brake lines and a T fitting.

The new lines can be secured under the front cross member. The arrows indicate the direction to the surge box.(Note: This image is from a mock up and as pictured in the previous image, the final T on the lower portion of the rack was shortened significantly.)
STEP 4: Finally, you can either run 2 additional hard lines from the T’s under the cross member to the surge box or you can use hose fittings and run flexible line. Either way, connect each line to a separate port at the bottom of the surge box and then fill the box 3/4 with power steering fluid. Then add the breather filter back to the top of the box.
(FINISHED PIC COMING SHORTLY)
Related Links
- MR2 Spyder Power Steering Removal (Part 1: Try Before You Buy)
- MR2 Spyder Power Steering Removal (Part 2: The Vented Surge Box)
- MR2 Spyder Power Steering Removal (Part 3: Disabling the P/S Warning Light)
- MR2 Spyder Power Steering Removal (Part 4: Summary and Final Install)
- MR2 Spyder Power Steering Removal (Appendix: Alternate Install)