
Replacing the front sway bar can be performed with the car parked on a level surface with the parking brake applied. However, it is a much quicker and easier install with the car lifted so I recommend placing your car on jack stands.
Remove the factory sway bar
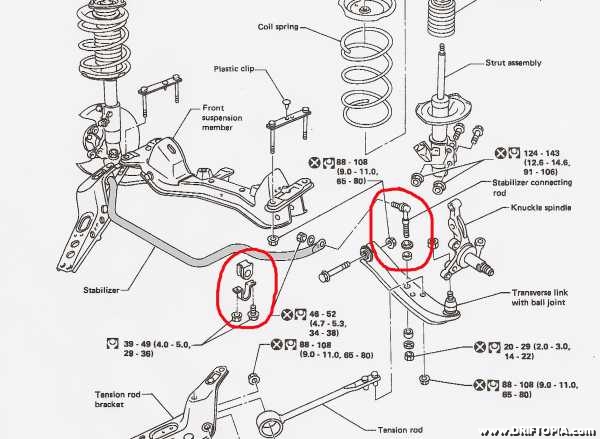
The factory sway bar (stabilizer) is connected to the suspension at the tension rod brackets and the control arm (transverse link assembly). First, disconnect the connecting rods from the control arms by locating the single nut in the underside of each arm that secures the connecting rod to the arm. Now trace the the sway bars path under the car until you locate the 2 U-shaped brackets that secure it to the tension rod brackets. Remove these two brackets and places them aside, with their hardware for reuse. The sway bar should now drop from the chassis.

This expanded view shows the front sway bar (stabilizer) in grey and the U-shaped bracket and connecting rod, circled in red. (fullsize)

The factory sway bar removed from the car.
Mounting the new sway bar
Assemble the Whiteline sway bar by greasing the inside and outside of the slotted bushings and placing the bushings onto the bar at each side. Use the brackets that were previously set aside to secure the bushings to the Whiteline bar. (this assembly is identical to the stock assembly) Raise the new bar into position and using the hardware set aside earlier, attach the bar to the chassis, leaving the brackets loosely tightened to allow for adjustments later.
Assemble and install the new connecting rods (end links)
First, attach the L-shaped bracket to the transverse link in the same location the stock connecting rods attached. Tighten this bracket down with the supplied washer and lock nut on the under side of the transverse link. Next connect the S-shaped link to the L-shaped bracket in this order: bolt, washer, link, L-shaped bracket, washer and lock nut. (if this is unclear, review the associated pictures on this page) Finally, attach the sway bar to the newly installed connecting rods. The order of assembly is: bolt, washer, S-shaped link, washer, sway bar, washer and lock nut. Be sure to connect the sway bar to the S-shaped link using the same holes on each side.

The new sway bar and connecting rod assembly.
Finishing up
Go around all the bolts and make sure they are fully tightened and set the sway bar to the desired stiffness. The holes closest to the front of the car are the softest setting while the holes towards the rear are the stiffest.
Note: After the first few drives on any modification, remember to take a few seconds and check for any bolts that may have loosened.


