
The KA24DE motor found in the US market 240sx is not the most powerful motor in the Nissan parts bin, however, with a few bolt-ons this motor can really come alive in its Naturally Aspirated form. One such bolt-on is the DC 4 into 1 header that yields a claimed 12hp over the stock header.
Set up
As with most installs, the car should be parked on a level, clean surface with the parking brake engaged. Additionally, I have installed the DC header without the car lifted but it becomes infinitely easier with the car on jack stands.
Remove the factory header
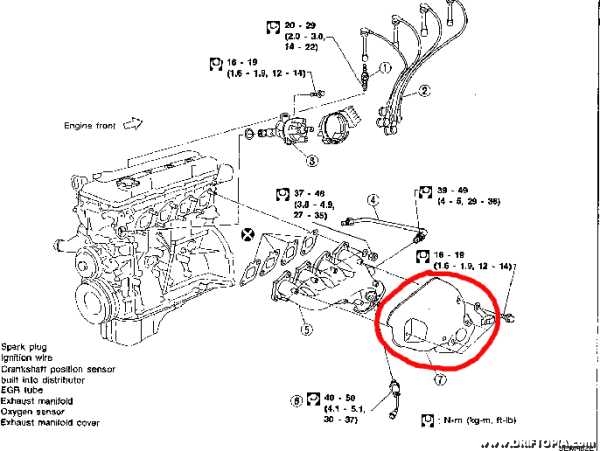
First, disconnect the lower portion of the header from the main exhaust, placing the hardware aside for reuse. Next, proceed to the engine bay and remove the heat shield from the header in order to gain access to the exhaust ports and the egr system. Now locate the 2 egr (exhaust gas recirculation) tubes by tracing the header down until you notice 2 tubes coming out of the sides. Disconnect these tubes using an adjustable wrench. (A rust penetrator, such as PB Blaster may be needed as the egr connections may have rusted to the header) Remove the O2 sensor from the side of the header and using a 14mm wrench, remove the 8 nuts and washers that secure the header to the cylinder head, setting them aside for reuse. Finally, pull the header away from the head and then snake the header out the top of the engine bay.

The rusted factory header connects to the exhaust underneath the chassis.

The heat shield covers the upper portion of the header and is circled in red. (fullsize)

You may need to use a rust penetrator such as PB Blaster to loosen the 2 highlighted egr tubes.
Install the DC header
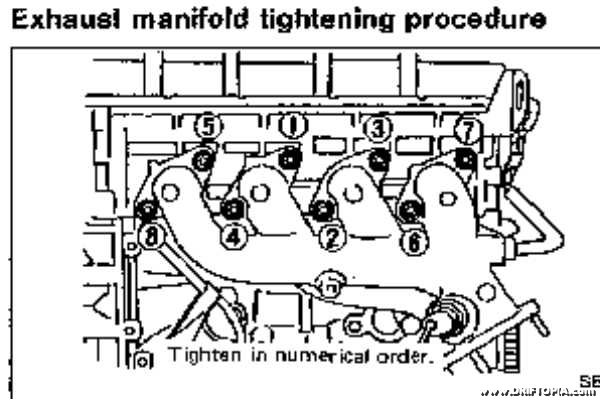
Before installing the new header, scrape any excess gasket material that may have been left from the stock header off of the exhaust ports. A razor blade works fine and take care not to apply too much pressure as that will lead to deep grooves in the mating surface. Next, insert the new gasket onto the cylinder head and then snake the new DC header into the engine compartment in the reverse manner that the factory header was removed. Tighten the new header to the cylinder head using the header nuts and washers previously set aside. Be sure to tighten the header to the head in the order shown below. (Not following the tightening order may result in warped mating surfaces.)

The tightening order of the header nuts should be strictly adhered to. (fullsize)
Next, reinstall the egr tubes into the new header. (This can become somewhat tedious as they have to line up perfect so be patient.) Finally, reinstall the carriage bolts to the lower header and tighten it back to the exhaust.
Modifying the O2 sensor
The DC header relocates the factory oxygen sensor to the underside of the car near the transmission so you will need to extend and then secure the extra wiring. Fortunately, the DC kit comes with two L brackets, zip ties, extension wire and wire splices.
First, cut your oxygen sensor wire between the O2 sensor and the harness plug. Using wire strippers, expose roughly 1/2″ of wire at each end. Now insert a wire splice onto each exposed end and crimp it to the wire with a pair of pliers. Next, insert one end of the extension wire into each open end of the wire splices and crimp the two ends. Give the newly extended wire a tug at each of the four new connections to make sure the wire is secure. (Note: Crimping wires together works but if you have a soldering iron and heat shrink, make the connection permanent by soldering them. Crimped connections have a tendancy to shake loose over time.) Take the unplugged O2 assembly and go underneath the car and thread the O2 sensor into the new header. Now snake the extended wire and plug up along the transmission and into the engine bay. Go ahead and plug the O2 sensor back into the harness. With the two L-brackets in hand, install them on the transmission by removing a bolt from the back of the transmission near the O2 wire and thread the bolt through the first bracket and then tighten it back to the transmission. Repeat this process with the second L-bracket , installing it further forward on the transmission near the bell housing. Basically, you are wanting to make a path towards the engine bay that keeps the wire off of the header and secured away from the ground. Once satisfied with the wire’s path, use the supplied zip ties and secure the wire to the L-brakets, leaving a small amount of slack between the O2 sensor and the first bracket to accomodate drivetrain and exhaust flex. Finally, loop any extra wire back on itself and zip tie it together to avoid any loose wires.

Not only does the DC header add noticeable power gains, it is a beautiful piece that helps clean up the 240sx’s engine bay.


