
Bleeding brakes is not the scary proposition that many people make it out to be. I often here it said that you do not touch your brakes unless you really know what you are doing. Well I’ve got some advice for them, how will you ever learn to maintain your brakes if you don’t ever try. And honestly, what follows is a very easy walkthrough that will allow anyone to bleed their brakes safely, quickly and completely with just a few garage tools.
Tools Needed
- Small length of clear nylon tubing and container to hold excess brake fluid
- 10mm or 8mm wrench depending on which size bleeder screws are in your calipers
- jack stands or a wheel jack
- a friend or loved one with an operational leg

This brake bleeding kit includes a small nylon line and an overflow tank that contains the fluid that comes out of the caliper. A larger container, like an old can can also be used.
Proceedure
To bleed the brakes you first need to determine the order to bleed the lines in. On all cars you will bleed the caliper that is the furthest from the master cylinder. The master cylinder is located in your engine bay and is where you will fill the system with brake fluid. Using this logic, the caliper located furthest from the master cylinder on the 240sx is the rear wheel passenger side. At this point you have two choices. You will have to either remove all of the wheels at once by placing the car on jack stands or you can rotate around the car with the tire jack removing only one wheel at a time as you bleed the caliper. So assuming that you have chosen one of the two methods above and now have access the rear passenger side caliper, go ahead and locate the bleeder screw and then place the nylon line over the screw.

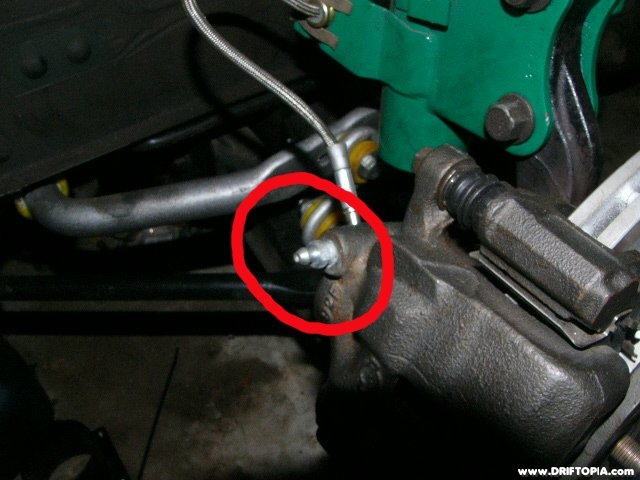
The bleeder screw on a s13 caliper is circled in red.
The nylon line will then connect to the overflow tank that you are using. Although not absolutely necessary, I recommend that your overflow tank be placed in a position above the bleeder screw as the air will come out of the lines easier with this set up. Next go to the front of the car and make sure that the master cylinder is topped off with new brake fluid. Throughout the bleeding process you will want to check the level of the fluid in the master cylinder. If at anytime the master cylinder runs out of fluid you will reintroduce air into the system and will have to start the bleeding process over.

This is the dirty master cylinder on my 240sx. Top this off as needed during bleeding.
Proceeding back to the caliper that you are bleeding first, have your assistant pump the brake pedal three times and then hold the brake pedal down. At this point you will slowly loosen the bleeder screw until brake fluid begins to move out of the line. Once the flow begins to slow down, close the bleeder screw by giving it a half turn and then repeat the pumping process (three pumps and hold) until you begin to see clear brake fluid in the nylon line. At first you will see a large number of air bubbles in the line and it is very important that you continue to repeat the process until you see no air bubbles line.
Once there are no air bubbles, ensure that the bleeder screw is snug by giving it a half turn (these screws / valves strip very easily so take care not to over tighten) and then proceed to the next caliper in the series following the “furtherest first” order. On the Nissan 240sx the order is as follows: passenger’s rear, driver’s rear, passenger’s front, driver’s front. Also keep in mind that if at anytime the master cylinder runs out of fluid, air will be reintroduced into the hydraulic lines and the bleeding will have to be repeated. Make sure to top off the master cylinder as needed.

This is the bleed line and container attached to the front driver’s side caliper. I am watching the line and working the valve while my assistant pumps the brakes.
With all of the brakes bled, fill the master cylinder to the full mark and then replace the cap. Start the car and pump the brake pedal a few times to ensure that proper pressure is maintained.
The following list will further clarify the process.
- Gain access to caliper and attach clear nylon line over the bleeder screw / valve
- Ensure that there is brake fluid in the master cylinder
- Have assistant pump the brakes 3 times and maintain the brake pedal in the down position
- Slightly loosen the bleeder screw and watch the fluid flow through the tube
- Once the flow slows close the bleeder screw
- If there is air or old fluid in the nylon line, go back to step 3 and repeat, all the while checking that there is adequate brake fluid in the master cylinder
- Once condition 6 is met, close the bleeder screw with a half turn and proceed to the next caliper following the order of farthest from the master cylinder first.
- Once all brakes are bled, top off the master cylinder, replace cap and start car. Pump brake pedal to ensure that proper pressure is maintained before driving car.


